Overview
Participants of the Podcast are requested to read through this instruction set to help get the best sound possible for the show. In a nutshell, you will be recording your sound separately as you participate in the discussion and uploading the resulting file for the editor to assemble and mix. This will allow for more control and better results.
If you haven’t already done so, please read through the Tips For Voice Audio article to get your performance sounding as good as possible before it is recorded. The better your sound is at the start, the better the end result will be.
For simplicity, Audacity is the recommended software to record your voice. It’s simple, powerful and free. If you are already setup with another Digital Audio Workstation, feel free to use it, but please read through the notes below to ensure your recording is consistent with the rest of the group.
It’s a good idea to take a few minutes to test out this workflow before the discussion to make sure everything works.
Setup
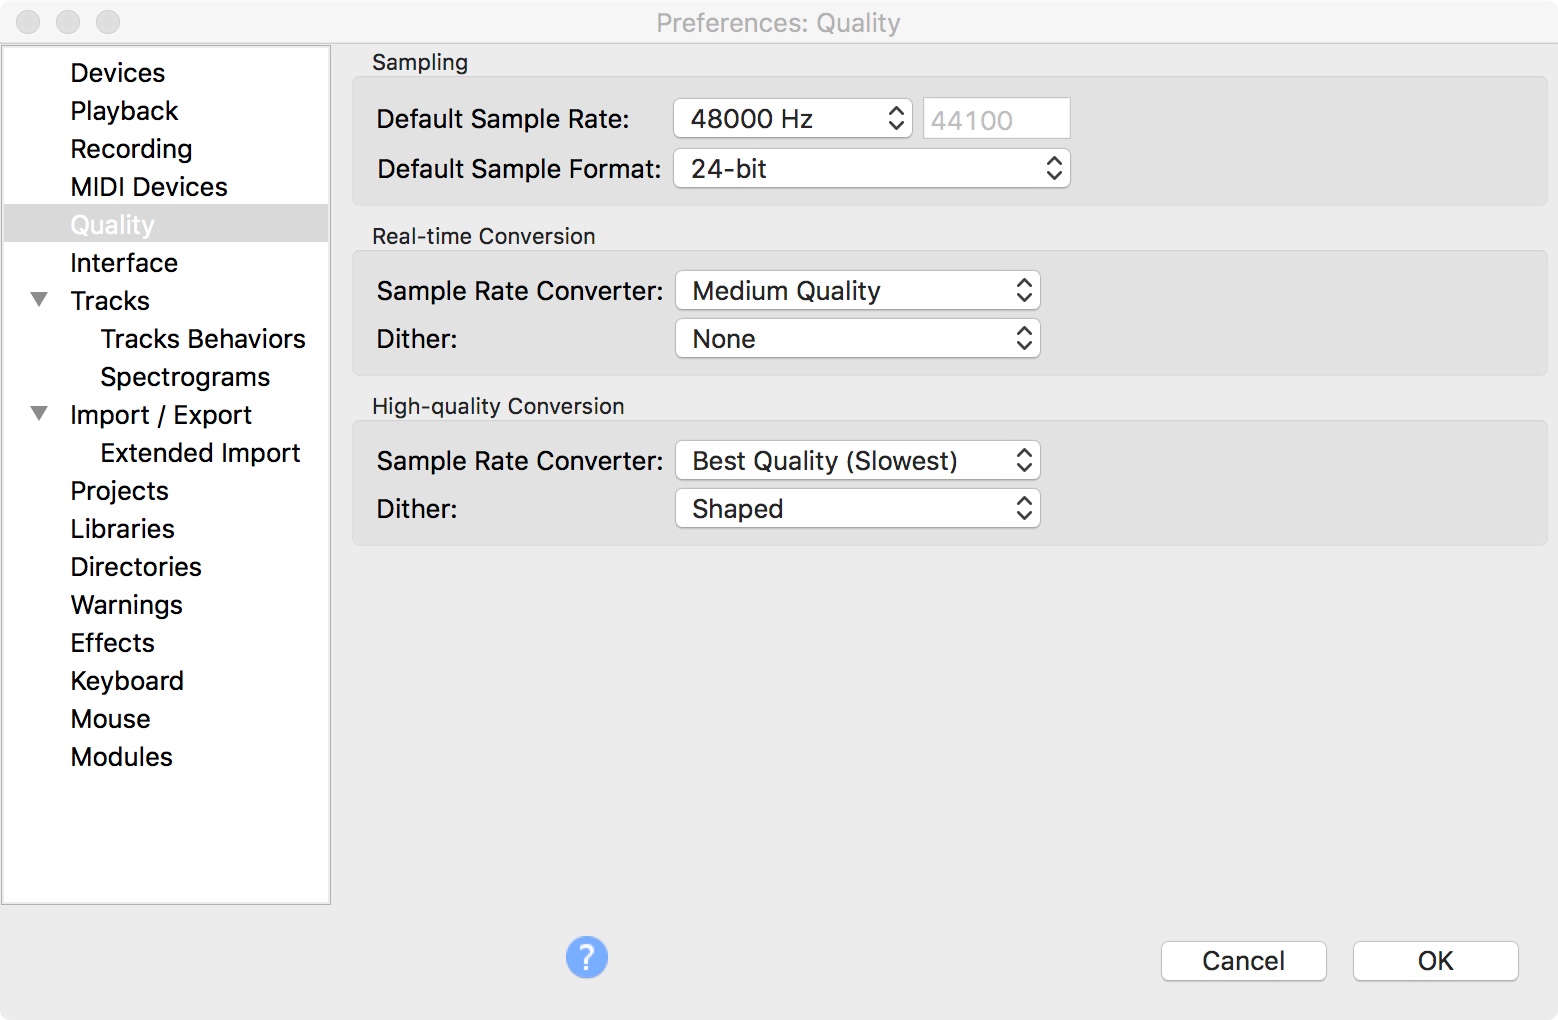
Download and install Audacity on your computer. The defaults settings for Audacity will be to record at 32-bit float and 44100 Hz. This podcast (and most broadcast audio) will use 24-bit and 48000 Hz, so please change your Quality Preferences to match.

Back at the main Audacity window, make sure sample rate settings are also correct in the bottom left of the window.

Next, make sure all your input settings are correct. If you have a USB interface or mic, you should see it where the below image lists “Core Audio” (near the top of the window). Ensure the correct device/input is set on the next drop down (it may be labeled as the input number or the device name) and that the channel is set to 1 (Mono) Recording Channel.

Now you’ll want to check that your levels are set to a good volume. It is actually a bad idea to adjust the input level in Audacity like the image above – it should be set before it gets to Audacity. If you are using an audio interface or USB mic, it should have an input level or gain knob. If you are using a sound card or on-board inputs, you will need to adjust them using the system’s input settings. Click the input levels to have them start monitoring and start talking into your microphone.

If you don’t see any activity on the meter, you’ll either need to increase your input level or adjust your input settings to select the correct device/input. Your goals it to have your loudest part of speach just tickle the yellow part of the meters (-6) and not hit any of the oranges or red.

If your levels are hitting the red, they are too loud. Turn them down.

If you are not getting past -36, then they are too quiet. Turn it up.

Don’t worry about getting it consistent. These raw tracks will have a lot of dynamics compared to the VOIP audio and sound a lot quieter. These tracks will be processed to sound better.
Once your levels are set, hit the Record button (red circle) to begin recording. Participate in the group countdown to help with sync and start the show. When complete, press the Stop button (square) to stop recording.

Delivery
Once you’ve finished recording, you’ll have a track with audio waveforms that looks like this:

You’ll need to save this file to somewhere on your computer. Go to File>Export>Export as WAV and select the destination. This file will be large (500 MB+), but MP3s have a lot of audio information removed making them not suitable for mixing. Please name your file with your name/handle and the date. Next, upload your file to the link provided to you by the team.
And that’s it, you’re all done.
It is possible to use a smartphone to record the tracks as well, but the quality will be lower and getting the audio off your device will be more challenging.
If you have any issues, please contact the host.
